
This guide provides you with a step-by-step process of setting up your website on Flux. It is one of a series that will guide you through setting up and moving to Flux from my experiences so far.
At this moment in time until the fiat on ramp becomes available again, you will need to purchase some Flux and have a Zelcore wallet. I will link another guide soon.
Registering Your Website
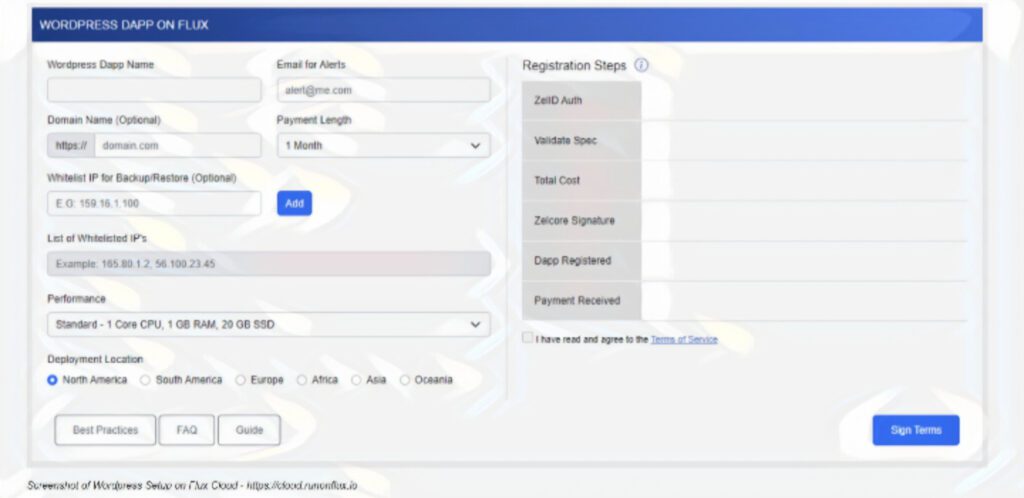
- Fill out all relevant fields on the Flux interface.
- Click ‘Validate & Get Cost’ to see the monthly cost of your DApp. Payment is in FLUX, and the US Dollar equivalent may fluctuate monthly.
- If satisfied with the cost, click ‘Accept Cost & Login’.
- To pay, download the Zelcore Wallet from Zelcore. Buy FLUX and add it to the Wallet.
- Click ‘Accept Cost & Login’ to authenticate via the Zelcore Wallet.
- Click ‘Get Zelcore Signature’ for additional security. Upon success, your DApp will be signed.
- Click ‘Register Dapp’ to submit your DApp for registration on the Flux Blockchain. You have one hour to submit payment.
- Click ‘Open Zelcore to Pay’. Confirm the pre-filled information and click ‘Send’. Payment processing may take up to 30 minutes.
- Once payment is complete, your DApp will register and propagate on the network.
- Go to your new WordPress site (Example: https://wordpress123456789.app.runonflux.io) and set your password. If you experience difficulties, contact Flux support.
Please Note: Once setup is complete you can point your own custom domain to Flux. Guide Here.
WordPress Admin Setup
If you’ve entered a custom domain during setup, add a CNAME record pointing to the automatically generated domain by Jetpack (Consult the Custom Domain Name Guide if needed).
Step by Step
- Open the custom domain in a browser (use the automatic .app.runonflux.io domain if you’re not using a custom one).
- Allow 10 to 30 minutes for all instances to spawn the app.
- Select your desired language and hit ‘Continue’.
- Fill in your Site Title, Username, Password, and Email, then hit ‘Install WordPress’.
- The successful installation will prompt a login display.
Common Installation Problems and Solutions
- Error establishing a database connection: If this error occurs, it may mean that not all required instances have spawned yet. Wait a bit longer and if the problem persists, you may need to manually remove the app from the problematic node using your ZelID.
- Already installed WordPress website: If you encounter a pre-installed WordPress site, you can either do a hard redeploy on all instances or connect to the database, remove the tables, and do a fresh install.
Additional Notes
- After installing a theme or plugin, wait a few minutes for the files to replicate on other nodes before activating them.
- After uploading media files, there might be a delay before they replicate and appear on other instances. Be patient during this process.
Well done, you just created your first decentralized Website. Welcome to flux.
Following Guides In Production
- How to Buy Flux to create your web 3 project
- How to Point Your Custom Domain
- How to Transfer Your Website
More Guides
Useful Links
- https://zelcore.io/
- https://wordpress.runonflux.io
- https://cloud.runonflux.io/#/guides/wordpress/steps
Thanks for reading and if you enjoy my content please follow me on twitter.
